Nginx
Nginx常用命令
nginx -t        #检查配置文件
nginx -s reload #重新载入配置文件
curl -I www.baidu.com
搭建虚拟主机步骤
- 增加一个完整的server标签段到结尾处
- 更改server_name及对应的root根目录
- 创建server_name域对应的网页根目录,并建立测试文件
- 检查nginx配置语法,平滑重启
- 做host解析或DNS解析
- 浏览器输入网址、curl、wget进行检查
主配置文件nginx.conf
Nginx配置段
//全局区
Worker_processes 1 ;//有1个工作的子进程,可以进行修改,意义不大,需要争抢CPU资源,一般设置为cpu核心数(cpu*单颗核心)

Event{
//一般是配置nginx链接特性
//如1个work能同时允许多少连接
Worker_connections 1024;//是指一个子进程最大允许连1024个链接
}

http{//配置http服务器的主要段
    server {//这是虚拟主机段
        location{//定位,把特殊的路径或文件再次定位,如image目录单独处理,
            //如php单独处理
    }
  }
}
Nginx虚拟主机配置
基于域名的虚拟机
server{
  listen  80;
  server_name www.bacd.com;
  location /{
    root html/www;
    index index.html index.htm;
  }
}

server{
  listen  80;
  server_name bbs.bacd.com;
  location /{
    root html/bbs;
    index index.html index.htm;
  }
}

server{
  listen  80;
  server_name chat.bacd.com;
  location /{
    root html/chat;
    index index.html index.htm;
  }
}
基于端口的虚拟机
server{
  listen  80;
  server_name www.bacd.com;
  location /{
    root html/www;
    index index.html index.htm;
  }
}

server{
  listen  81;
  server_name bbs.bacd.com;
  location /{
    root html/bbs;
    index index.html index.htm;
  }
}
基于IP的虚拟机
server{
  listen  10.0.0.10:80;
  server_name www.bacd.com;
  location /{
    root html/www;
    index index.html index.htm;
  }
}

server{
  listen  10.0.0.11:80;
  server_name bbs.bacd.com;
  location /{
    root html/bbs;
    index index.html index.htm;
  }
}
Nginx禁止直接通过IP地址访问网站以及限制IP登陆某目录(关闭默认站点或空主机头)
国内因为备案的原因,所有服务器都要禁止使用IP访问网站。否则,如果允许使用IP访问网站,那随便解析一个域名到该IP,访问该域名就可以打开网站了。这是一个极大的风险!Nginx中可以很方便的来解决这个问题,小菜鸟来跟大家一起探讨一下。
如下的配置项,可以设置允许使用IP访问网站。
server {
    listen       80;
    server_name  "";
}
这里相当于是绑定了一个空的主机头,于是任意主机头,只要是指向这个IP的都可以打开网站了。
也可以把这些流量收集起来,导进到本人的网站,只需做以下跳转设置就可以:
server {

listen 80 default;
rewrite ^(.*) http://www.abc.com;
}
如果需要Nginx禁止使用IP访问网站,可以定义如下主机,丢弃这些请求:
server {
    listen 80default;
    server_name "";
    return  444;
}
或者
server {
listen 80 default;
server_name _;
return 500;
}
在这里,我们设置主机名为空字符串以匹配未定义“Host”头的请求,而且返回了一个nginx特有的,非http标准的返回码444,它可以用来关闭连接。
从0.8.48版本开始,这已成为主机名的默认设置,所以可以省略server_name "",即如下的配置即可:
server {
    listen   80;
    return   444;
}
限制某IP登陆网站 allow all;
deny all;
其中网段的写法是这样的:192.168.1.0/24这样的形式。
deny 192.168.1.11; deny 192.168.1.123; deny 10.0.1.0/24;
如果你想实现这样的应用,除了几个IP外,其他全部拒绝, 那需要你在ip.balcklist中这样写 然后在在nginx的配置文件nginx.conf中加入:include blocksip.conf; 或者直接在相应虚拟主机server{中填写}
allow 1.1.1.1;
allow 1.1.1.2;
allow 192.168.1.0/24;
deny all;
如果你想实现这样的应用,禁止几个IP,其他通过,
deny 1.1.1.1;
deny 192.168.1.0/24;
allow all;
单独网站屏闭IP的方法:
在server"{}",在这个大括号内加入deny IP地址是限制某IP地址访问;allow IP地址是只允许某IP地址访问;
屏蔽单个IP的命令是
deny 123.45.6.7
封整个段即从123.0.0.1到123.255.255.254的命令
deny 123.0.0.0/8
封IP段即从123.45.0.1到123.45.255.254的命令
deny 124.45.0.0/16
封IP段即从123.45.6.1到123.45.6.254的命令是
deny 123.45.6.0/24
重启nginx后的检测
Nginx 监控
location /nginx_status{
    stub_status on;
    access_log off;
    allow 10.0.0.0/24;
    deny allow;
}
server:启动nginx到现在共处理的连接数
accepts:启动nginx到现在创建的握手数
请求丢失数=握手数-连接数
handled requests:表述共处理请求数
reading:读取到客户端的header信息数
writing:返回给客户端的header信息数
waiting:nginx已经处理完正在等候下一次请求指令的驻留连接。开启keepalive的情况下,这个值等于active-(reading+writing)为了安全,这个状态要防止被外部用户看到
集成php环境
配置php环境,修改nginx.conf,支持php
# pass the PHP scripts to FastCGI server listening on 127.0.0.1:9000

location ~ \.php$ {
    root           html;
    fastcgi_pass   127.0.0.1:9000;
    fastcgi_index  index.php;
    fastcgi_param  SCRIPT_FILENAME  D:/app/nginx-1.12.1/html$fastcgi_script_name;
    include        fastcgi_params;
}nginx.conf中fastcgi_param SCRIPT_FILENAME /scripts$fastcgi_script_name修改为fastcgi_param SCRIPT_FILENAME D:\app\nginx-1.12.1\html$fastcgi_script_name;不能访问,提示‘No input file specified’,nginx access.log中出现404,将\替换为/正常,fastcgi_param SCRIPT_FILENAME D:/app/nginx-1.12.1/html$fastcgi_script_name。
编辑index.php文件
<?php phpinfo(); ?>执行命令nginx -s reload
访问http://localhost/phpinfo.php查看是否可以打开phpinfo页面
虚拟主机的别名配置
server_name可以添加多个主机名,别名之间用空格分隔
server{
  listen  10.0.0.11:80;
  server_name bbs.bacd.com b.abcd.com abcd.com;
  location /{
    root html/bbs;
    index index.html index.htm;
  }
}
集群中多个服务器提供相同的服务,通过前端负载进行分发,为了对每个主机进行检测,可以使用别名分别进行监测
   ...
   server_name www.bacd.com www1.abcd.com;
   ...
   server_name www.bacd.com www2.abcd.com;
   ...
隐藏版本信息
然后在配置文件中,http区段中插入“server_tokens off;”,重新载入配置文件:
http {
include       /etc/nginx/mime.types;
default_type  application/octet-stream;
log_format  main  '$remote_addr - $remote_user [$time_local] "$request" '
                  '$status $body_bytes_sent "$http_referer" '
                  '"$http_user_agent" "$http_x_forwarded_for"';

access_log  /var/log/nginx/access.log  main;

sendfile        on;
#tcp_nopush     on;

keepalive_timeout  65;

gzip  on;

server_tokens  off;

include /etc/nginx/conf.d/*.conf;
}
## Nginx 日志
### Nginx error_log
`error_log logs/error.log [debug|info|crit|alert|emerg]`

可以设置的标签段为

`#content:main,http,server,location`

### Nginx access_log

**Module:** ngx_http_log_module

http://nginx.org/en/docs/http/ngx_http_log_module.html

`access_log logs/access.log main`

### Nginx 日志切割

1. 创建脚本`runlog.sh`
!/bin/bash
LOGPATH=/usr/local/nginx/logs/abcd.com.access.log BASEPATH=/data
bak=$BASEPATH/$(date -d yesterday +%Y%m%d%H%M).abcd.com.access.log
mv $LOGPATH $bak
touch $LOGPATH
kill -USR1 cat /usr/local/nginx/logs/nginx.pid
或者使用`nginx -s reload` 替换kill -USR1 \`cat /usr/local/nginx/logs/nginx.pid\`

2. 添加计划任务(每分钟执行一次)

    `crontab -e`添加计划任务

    `*/1 * * * * sh /data/runlog.sh >/dev/null 2>&1`

    `crontab -l` 查看计划任务

## location
### location语法
location[=|~|~*|^~|@] uri{ ... }
=:精确匹配 ~:大小写敏感匹配 ~*:不区分大小写 !:取反 ^~:不做正则检查,常规检查 @:
### location 测试
server { listen 1006; server_name 192.168.0.121;
location = / {
    return 401;
}

location / {
    return 402;
}

location /documents/ {
    return 403;
}

location ^~ /images/ {
    return 404;
}

location ~* \.(gif|jpg) {
    return 500;
}
}
`curl -s -o /dev/null -I -w "%{http_code}\n" http://192.168.0.121:1006/`[root@ops-83 conf.d]# curl -s -o /dev/null -I -w "%{http_code}\n" http://192.168.0.121:1080 401 [root@ops-83 conf.d]# curl -s -o /dev/null -I -w "%{http_code}\n" http://192.168.0.121:1080/ 401 [root@ops-83 conf.d]# curl -s -o /dev/null -I -w "%{http_code}\n" http://192.168.0.121:1080/abc 402 [root@ops-83 conf.d]# curl -s -o /dev/null -I -w "%{http_code}\n" http://192.168.0.121:1080/documents 402 [root@ops-83 conf.d]# curl -s -o /dev/null -I -w "%{http_code}\n" http://192.168.0.121:1080/documents/ 403 [root@ops-83 conf.d]# curl -s -o /dev/null -I -w "%{http_code}\n" http://192.168.0.121:1080/documents/abc 403 [root@ops-83 conf.d]# curl -s -o /dev/null -I -w "%{http_code}\n" http://192.168.0.121:1080/images/ 404 [root@ops-83 conf.d]# curl -s -o /dev/null -I -w "%{http_code}\n" http://192.168.0.121:1080/IMAGES/ 402 [root@ops-83 conf.d]# curl -s -o /dev/null -I -w "%{http_code}\n" http://192.168.0.121:1080/images/abc.jpg 404 [root@ops-83 conf.d]# curl -s -o /dev/null -I -w "%{http_code}\n" http://192.168.0.121:1080/images/ABC.JPG 404 [root@ops-83 conf.d]# curl -s -o /dev/null -I -w "%{http_code}\n" http://192.168.0.121:1080/abc.jpg 500 [root@ops-83 conf.d]# curl -s -o /dev/null -I -w "%{http_code}\n" http://192.168.0.121:1080/abc.JPG 500 [root@ops-83 conf.d]#
/:默认匹配 =:优先,和顺序无关 ^~ 和 ~*:有限匹配^~
## rewrite
### rewrite语法
### rewrite示例
server { listen 1006; server_name www.abcd.com abcd.com;
location = / {
    rewrite ^/(.*) http://www.xx.com/$1 permanent;
}
}
`$1`后向引用,`permanent`永久跳转,类似301。

url重写
location /cathtml{ root /ecmoban/www; index index.php index.html index.html;
rewrite "cathtml-(\d{1,7}).html" "/category.php?id=(\d{1,7})";
rewrite "cathtml-(\d+).html" /category.php?id=$1;} location /goods{ root /ecmoban/www; index index.php index.html index.html; rewrite "goods-(\d+).html" /goods.php?id=$1; }
`(\d+)`,为任意个数字,`$1`为后向引用,前面匹配的可以在后面直接调用

## nginx访问认证
### 配置文件修改
location /{ auth_basic "xxxx"; auth_basic_user_file conf/htpasswd; }
使用位置:http/server/location/limit_except

### 生成密码文件
可以使用apache自带的“htpasswd ”或“openssl passwd”设置。
htpasswd -bc /etc/nginx/conf/htpasswd wanghui 1234567
chmod /etc/nginx/conf/htpasswd
chown nginx /etc/nginx/conf/htpasswd
重新加载生效nginx -t
nginx -s reload
## nginx 的目录浏览
### autoindex
server{ listen 10.0.0.11:80; server_name bbs.bacd.com b.abcd.com abcd.com; location /{ root html/bbs; autoindex on; index index.html index.htm; } }
## 提升网站性能
### 启用nginx 压缩

查看nginx中文件类型准确写法mime.types,可以放置在http、server、location段的位置
gzip on;
gzip_buffers 32 4k;
gzip_comp_level 6;
gzip_min_length 20;
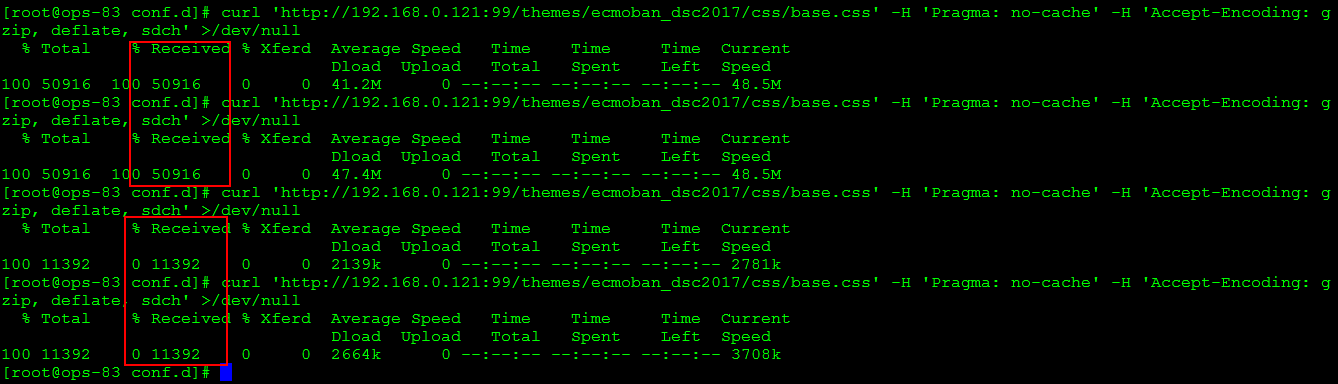
gzip_types text/css text/xml application/x-javascript;对比测试结果:\
`curl 'http://192.168.0.121:99/themes/ecmoban_dsc2017/css/base.css' -H 'Pragma: no-cache' -H 'Accept-Encoding: gzip, deflate, sdch' >/dev/null`
### expires缓存
通过正则表达式对.jpg/.js/.png/.gif进行缓存,没有缓存的css就没有过期时间。同时需要注意正则表达式写法,如果gif后有“|”,则要匹配一个空字符串,相当于所有的都能匹配上了。location ~ .(jpg|js|png|gif){ expires 1d; root /ecmoban/www; }
### 负载均衡
[root@ops-83 conf.d]# grep -v '#' back-101.conf
server {
listen 1001;
servername ;
access_log /var/log/nginx/101.access.log main;
location / {
root /usr/share/nginx/back_html_101;
index index.php index.html index.htm;
}
error_page 404 /404.html;
location = /404.html {
root /usr/share/nginx/back_html_101;
}
error_page 500 502 503 504 /50x.html;
location = /50x.html {
root /usr/share/nginx/back_html_101;
}
location ~ .php$ {
root /ecmoban/www;
fastcgi_pass 127.0.0.1:9000;
fastcgi_index index.php;
fastcgi_param SCRIPT_FILENAME $document_root$fastcgi_script_name;
include fastcgi_params;
}
}
[root@ops-83 conf.d]# grep -v '#' back-102.conf
server {
listen 1002;
servername ;
access_log /var/log/nginx/102.access.log main;
location / {
root /usr/share/nginx/back_html_102;
index index.php index.html index.htm;
}
error_page 404 /404.html;
location = /404.html {
root /usr/share/nginx/back_html_101;
}
error_page 500 502 503 504 /50x.html;
location = /50x.html {
root /usr/share/nginx/back_html_101;
}
location ~ .php$ {
root /ecmoban/www;
fastcgi_pass 127.0.0.1:9000;
fastcgi_index index.php;
fastcgi_param SCRIPT_FILENAME $document_root$fastcgi_script_name;
include fastcgi_params;
}
}
[root@ops-83 conf.d]# grep -v '#' back.conf upstream up_test{ server 192.168.0.121:1001; server 192.168.0.121:1002; }
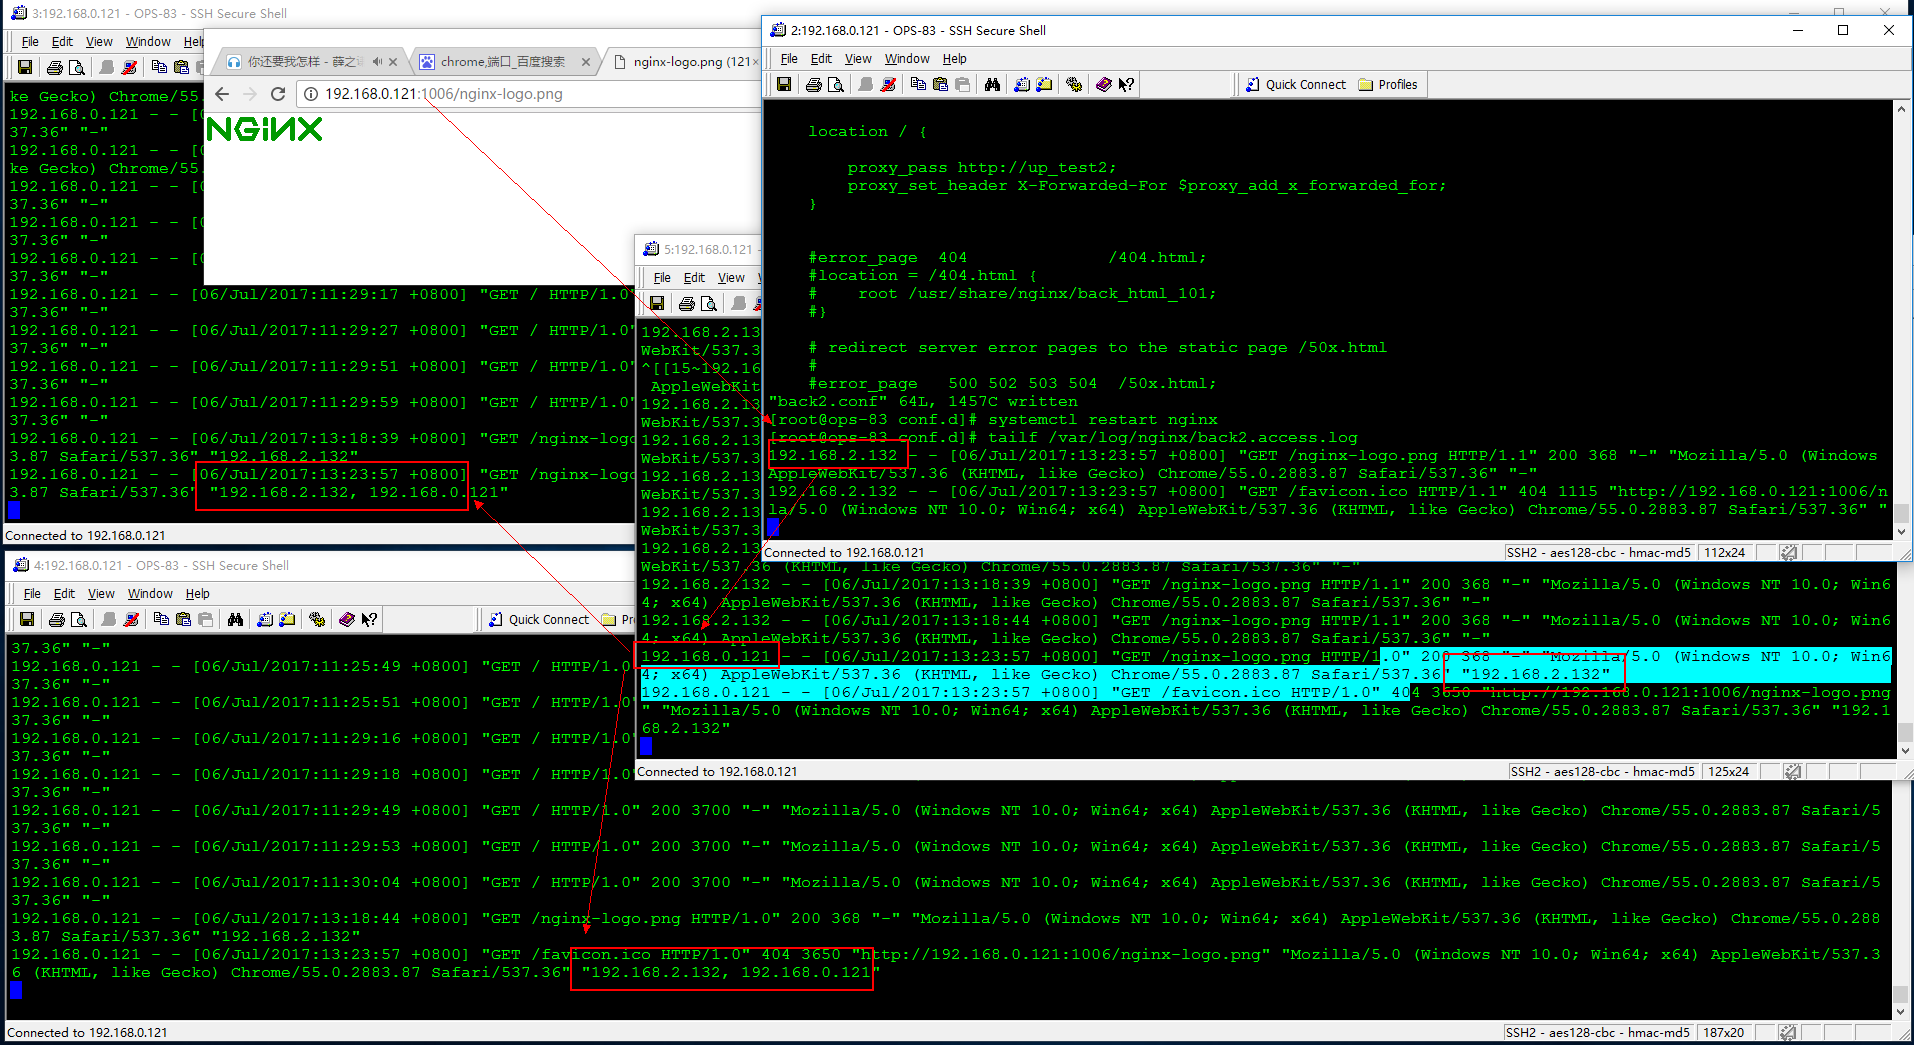
server { listen 1005; servername ; gzip on; gzip_buffers 32 4k; gzip_comp_level 6; gzip_min_length 20; gzip_types text/css text/xml application/x-javascript; access_log /var/log/nginx/back.access.log main; location / { proxy_pass http://up_test; } }
在经过负载均衡后,客户端源ip将丢失,为了准确获得源ip,需要增加参数`proxy_set_header X-Forwarded-For $proxy_add_x_forwarded_for`。本次测试由1006端口(代理)->1005(代理)->(1001、1002),最终实现1005日志中记录了源ip(客户端),1001、1002中记录了源ip(客户端)及二级代理ip(1005)。
 \